

How To Install A Railing On Stairs Inside
Install a New Stair Handrail
So strong it's kid-proof! We'll evidence you how to do information technology.
![]() Time
Time
A full day
![]() Complication
Complication
Intermediate
![]() Cost
Cost
$51–100
Introduction
If you take a loose stair rail, a weak stair rails or no track at all, fix the trouble by installing a solidly anchored railing similar nosotros evidence here. Would your stair runway hold up to three energetic youngsters hanging on information technology similar this? If you're not sure, or if you take stairways with missing rails, at present's the fourth dimension to prepare the problem. More than accidents happen on stairways than anywhere else in the house, and a stiff stair rail goes a long way toward making stairs safer and easier to utilize. In this article, we'll show you how to cut and assemble your runway, how to mount it solidly to the wall framing and make up one's mind the proper handrail height.
Tools Required
Materials Required
- 150-grit sandpaper
- 4d end nails
- 90-second epoxy
- Masking tape (1-1/2-in. wide)
- Railing brackets
- Railing textile
- Wood glue
Measure the stair and purchase the stair railing
The pattern we chose to replace stair railings lightly exceeds the edifice codes in many regions. Nosotros extended the stair railing beyond both the meridian and the lesser steps. While this isn't always possible, it allows you to grasp the stair railing sooner and hold onto the stair handrail longer to maintain good residual.
Earlier you go shopping for your handrails for stairs, measure from the nosing of the top landing to the flooring at the lesser of the stairs and add 2 ft. This is the length of stair railing material y'all'll need. You'll find code-canonical handrail and the other materials you lot'll demand at lumberyards and domicile centers.
Hardwood handrails for stairs like the oak stair railing we're using are more expensive. Pine and poplar rails toll less. In add-on to the stair railing, yous'll need wall mounted handrail brackets, a bundle of two-office, 90-second epoxy, and about 4 ft. of 2×4. Purchase enough brackets to install two at the top, one at the lesser and one every 48 in. between the top and the bottom of the stair railing.
Check out these 100 domicile improvement hacks you'll wish yous knew sooner.
Project step-by-step (17)
Stride 1
Mark the studs and standard railing height
To replace stair railing, start past finding and marking studs. In order to be safe, handrails for stairs must be anchored securely to the wood framing behind the drywall or plaster.
Here are a few tips for locating the studs:
- Showtime by inspecting the skirt board to see if yous can find a pattern of nails that may indicate studs. And then use a stud finder to verify the locations.
- Most studs are xvi in. on center, then once you find one, yous tin can try measuring horizontally to locate the adjacent one.
- When y'all find a stud, marking information technology with a strip of masking tape. We used blueish tape for photo clarity, simply easy-to-remove (low tack) masking record would be a better selection to avoid damaging the paint or wallpaper.
- Mark every stud forth the stairs plus one across the top and bottom risers. You'll decide later which ones to utilise. Studs aren't always where you desire them.
- If no stud is bachelor at the top, use metallic toggle anchors to mountain the bracket under the short horizontal section of rail.
- If the wall ends close to the summit or bottom step, you won't exist able to extend the track. Instead, simply return it to the wall.
In improver to finding the studs, y'all have to make marks at the tiptop and bottom of the stairway to signal the standard railing height of the rail above the stairs. To meet building lawmaking requirements, the stair railing should be mounted and so that the top of the handrail superlative is 34 to 38 in. above the front edge of the stair nosings. We chose 36 in. Pace 3 (below) shows how to find this wall mounted handrail= height point at the superlative of the stair. Don't be i of those guys! Check out these13 cringe-worthy home improvement fails.
Stride 2
Locate the studs
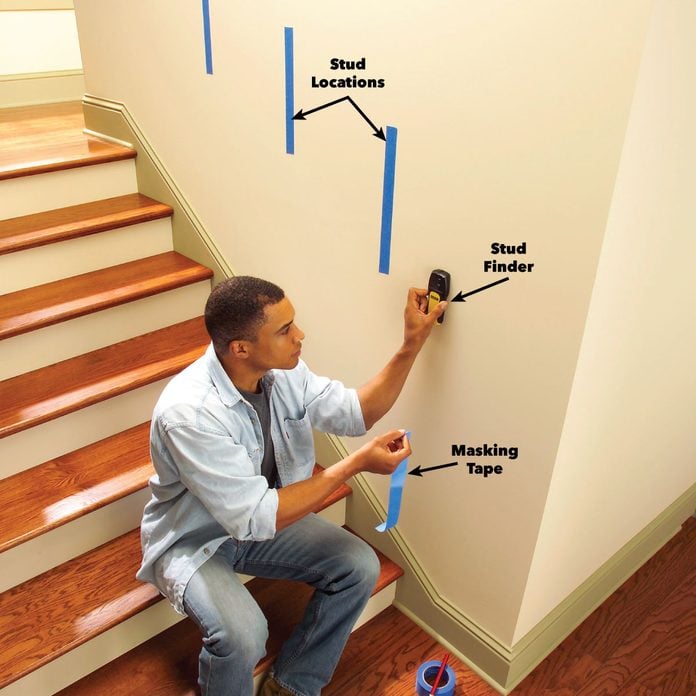
Locate the studs in the wall to a higher place the stairs. Use a stud finder and mark the locations with strips of i-1/ii in. masking tape centered well-nigh 36 in. in a higher place the stairs.
![]()
Step 3
Plumb up from the front border

Plumb upwards from the front edge of the pinnacle stair nosing and stick a piece of record to the wall. Make a vertical line even with the front of the nosing and a horizontal line at 36 in. Do the aforementioned at the bottom tread.
Afterward y'all'll align the top of the rail with these handrail peak marks and locate the rail brackets. Then you'll employ the mark at the top to position the track earlier you adhere it to the brackets.
Step 4
Cutting the rail to length and fit the joint
The next step is to cut the stair railing and glue on the brusque horizontal section at the acme. Since the rail runs parallel to the stairs, you can use the stair noses as a guide for cut the rails to the right length and figuring the top angle.
Footstep 5
Cut a 45-degree miter

Start past cut a 45-degree angle on ane end of the stair railing and rest this end on the floor. This cut is for the short return to the wall.
Stride 6
Close-Up: Cut a 45-degree miter
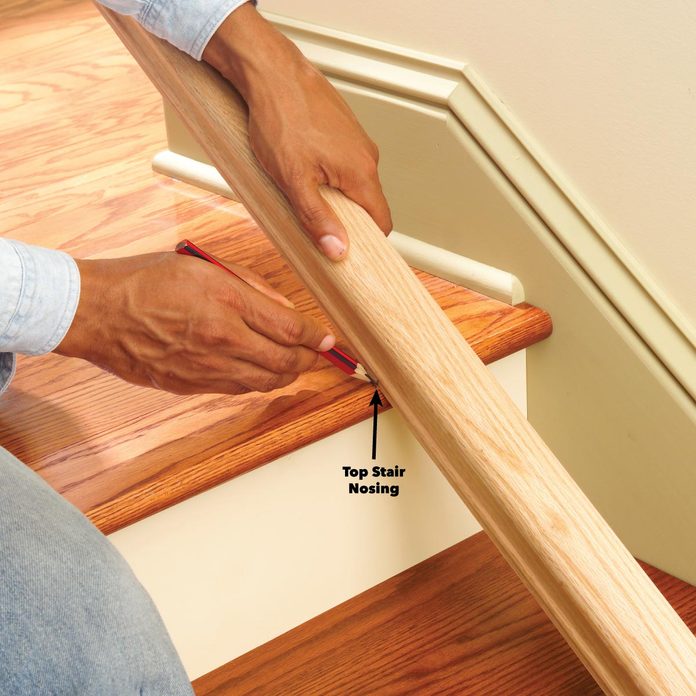
With the runway resting on the front of the stair treads, marking where the rail contacts the summit stair nosing.
Pace seven
Power miter saw

Set your ability miter saw to cut a sixteen-degree angle and saw the rail at the mark. Cut the opposite xvi-degree angle on the remaining rail slice. Use information technology for the horizontal height section. This is an judge angle. Yous'll test the fit.
Pace viii
Test the fit

Test the fit of the rail joint. Conform the cut angle and recut both pieces until the joint is tight. Don't worry if you lot lose a niggling length on the rails. It'll just reduce the distance the rail extends at the bottom, which isn't disquisitional.
When you're satisfied with the fit, cut the brusk horizontal stair railing section to length with a 45-degree miter on the end. Make it long enough to extend a few inches by the next stud so y'all can add a wall-mounted handrail bracket under it.
Step 9
Gum the joint with epoxy
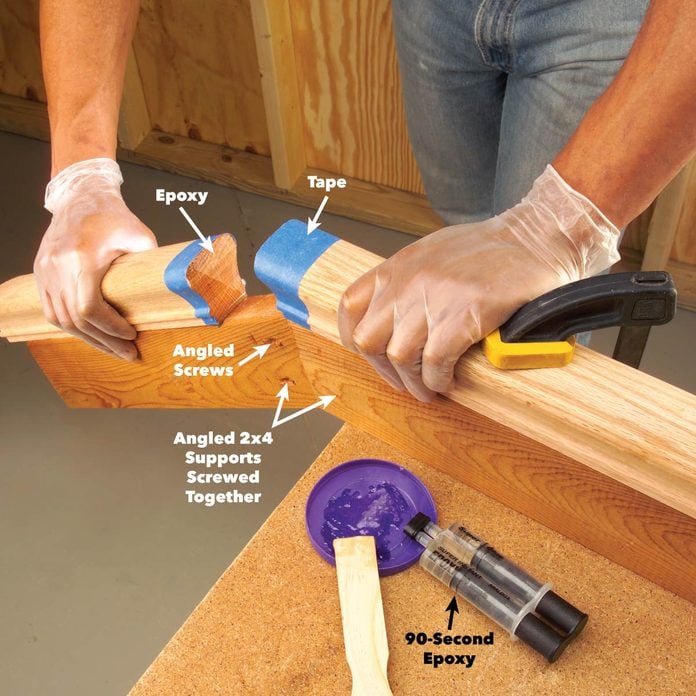
The shallow bending makes it difficult to bring together the brusk and long stair railing sections with nails or screws. And dowels or other joining methods require a furniture maker'southward precision. And so instead we'll prove you a simple method to join the two with fast-setting epoxy.
Cut 2x4s on edge at the same angle as the track and join them with screws driven at an angle. Then support the track sections with the 2x4s as you press and hold the articulation together. With ninety-second epoxy, you'll be able to hand-hold the joint together long enough for the epoxy to grab. Concentrate on keeping the profiles exactly lined up and pressing the rails tight together to eliminate gaps. Then leave the joint undisturbed for at least an hour. Overnight would be improve, since the epoxy doesn't arroyo maximum force for at to the lowest degree 24 hours.
To protect the wood from epoxy that may ooze out, wrap the rails ends with masking tape. Trim excess tape affluent to the cut end with a sharp utility knife. And then carefully remove the tape later the epoxy has set for 5 minutes. The finished articulation will probably require sanding to fifty-fifty up the edges. Do this subsequently the epoxy hardens.
Stride 10
Marshal the top of the stair guardrail

Align the pinnacle of the handrail with the 36-in.-loftier marks on the record (see close-up photo, below), and marking along the underside of the rail at each stud location for the handrail top.
Pace 11
Close-Upwards: Marshal the meridian of the stair guardrail
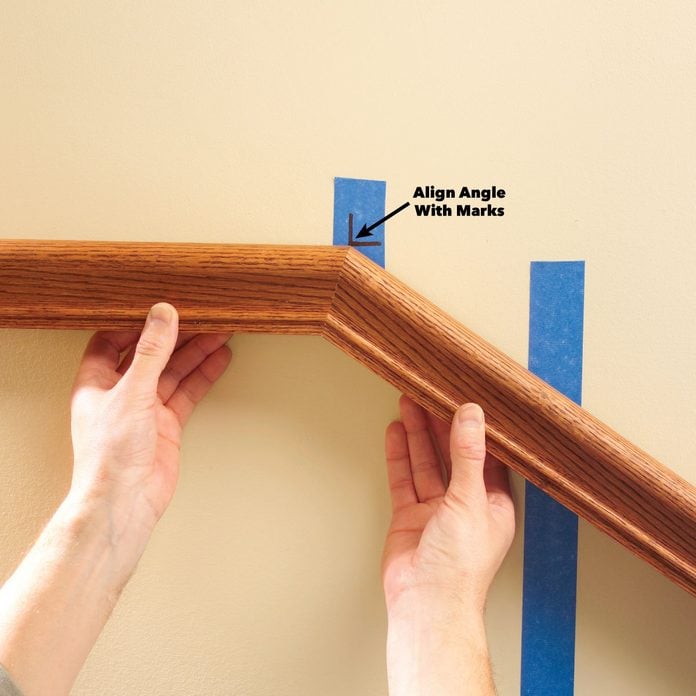
Align the railing with the joint marking on the wall and pay close attending to the handrail elevation.
Stride 12
Eye the track bracket

Eye the stair railing bracket vertically on the stud and sight across the summit to marshal it with the mark to ensure the handrail height. And then mark all three screw holes. Practice this at the studs closest to the top and bottom of the rail.
Footstep 13
Locate the heart of the stud
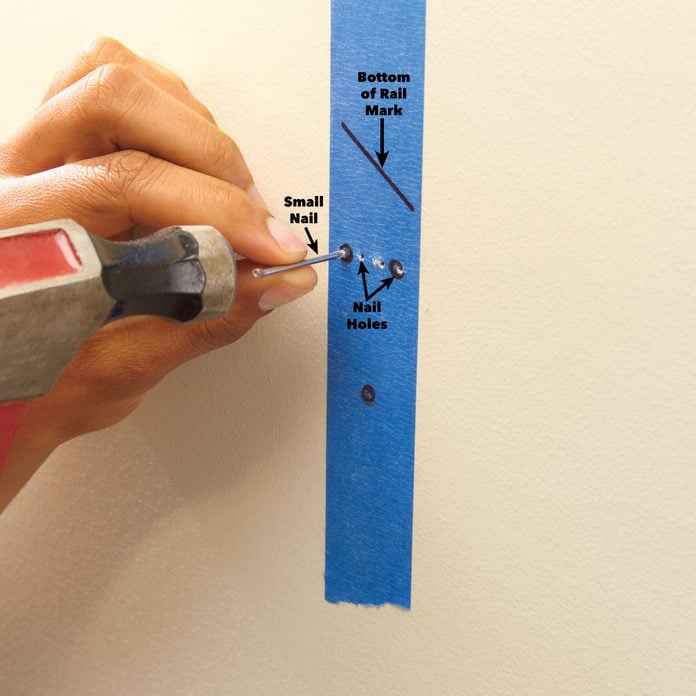
Locate the exact eye of the studs. Probe the wall with a finish nail to locate the exact center of the stud. Tap gently to feel when the blast hits solid wood or misses the stud and goes in hands. Shift the subclass if necessary to center it on the stud until there's solid woods behind both acme holes and the proper handrail height is maintained.
This is an of import footstep considering the rail brackets must exist centered on the stud or one of the two pinnacle screws will miss the framing. If yous shift the bracket, make sure to adapt the handrail summit to continue the top aligned with the marker. You may have to patch a few nail holes, but this beats having a subclass pull loose.
Step 14
Drill pilot holes

Drill one/8-in. pilot holes for the rail bracket screws. You should experience the bit drilling into solid forest. Bending holes slightly toward the center to brand sure the spiral grab the stud and to have proper handrail height.
Step 15
Screw the bracket to the wall

Remove the masking tape and screw the subclass to the wall. Angle the top screws slightly to follow the angled pilot holes
Be conscientious when you lot bulldoze the screws included with the brackets. The heads will break off easily if you don't predrill airplane pilot holes. If you're driving the screws with a drill, mount the bit in a magnetic scrap holder to extend it away from the drill. This will give you lot more clearance for driving the angled screws.
Stride 16
Adhere the rail to the brackets

Install the top and bottom brackets first and mountain the rail to them. Attach the rail to the brackets with the screws and strap provided. So add the subclass under the short horizontal department. Finally, sight down the stair railing and straighten it before adding the intermediate brackets.
Step 17
Add the returns and stop up
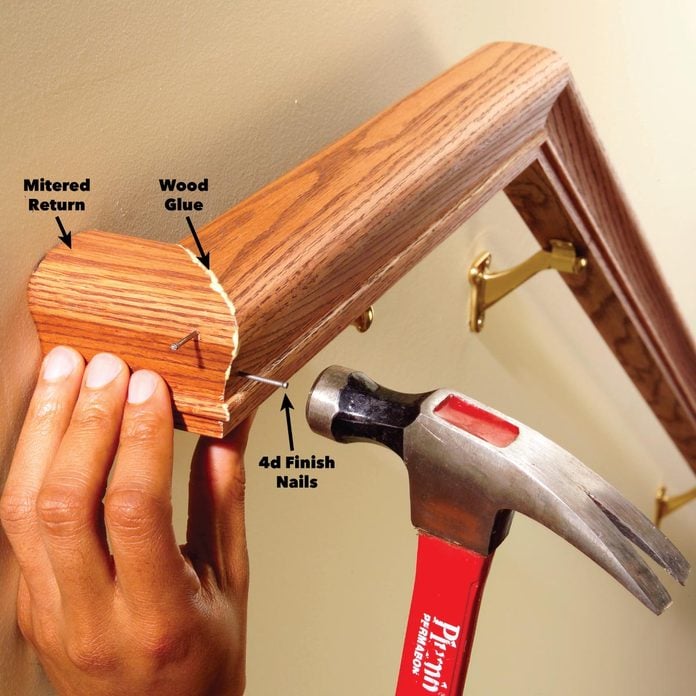
With the stair railing mounted, information technology'south easy to measure for and install the short pieces that return to the wall at the meridian and bottom of the rail.
Measure out from the long signal of the 45-caste miter on the rail to the wall and add near 1/sixteen in. for a tight fit. And then cut the returns on your power miter saw. Cutting them from longer pieces (at least 12 in.) to avoid getting your fingers too close to the blade.
These returns are required by the building code, and for good reason. They eliminate the possibility that loose clothing or a bag strap could become hung up and cause a fall. As well, they create a nice finished wait on the ends of the stair railing. We fastened the returns with wood glue and 4d finish nails, but you could too use the remaining 90-2nd epoxy. Predrill 1/16-in. holes, and so glue and tack the joint with 4d finish nails. Recess the nails with a nail set.
Once the rail is complete, you tin can have it off to paint or finish it by simply removing the screws from the U-shaped brackets. Since the screw holes are already drilled, it'll be like shooting fish in a barrel to reinstall.
Here'south how to install an outdoor stair railing.
Originally Published: August 09, 2022

Source: https://www.familyhandyman.com/project/install-a-new-stair-handrail/
Posted by: karstenmurs1979.blogspot.com
0 Response to "How To Install A Railing On Stairs Inside"
Post a Comment